Using Route Guards, Actions and Web Components with TypeScript
Oct 9, 2020 · 6 minutes read · Follow @luixaviles
Imagine you are building a Single Page Application using Web Components only, you already defined a set of views, configured the routes and you’re handling the authentication very well.
Suddenly you understand that you must manage autorizations to decide to render a view or not. For example, you need to manage the /admin and /analytics route for authorized users only.
In a previous post, I explained how to define rules to avoid loading pages for restricted users using the Navigation Lifecycle functions from Vaadin Router. In fact, a solution based on the use of these functions works very well for simple and isolated views.
However, what happens when you want to manage this type of authorization along a hierarchy of routes or several routes at the same time? Let’s see how we can practically handle these types of scenarios using our LitElement Website based on TypeScript.
Route Guards
Route Guards are also known as Navigation Guards and they are implemented in most popular frameworks like Angular, Vue, and others. Let’s take a look at the following image:
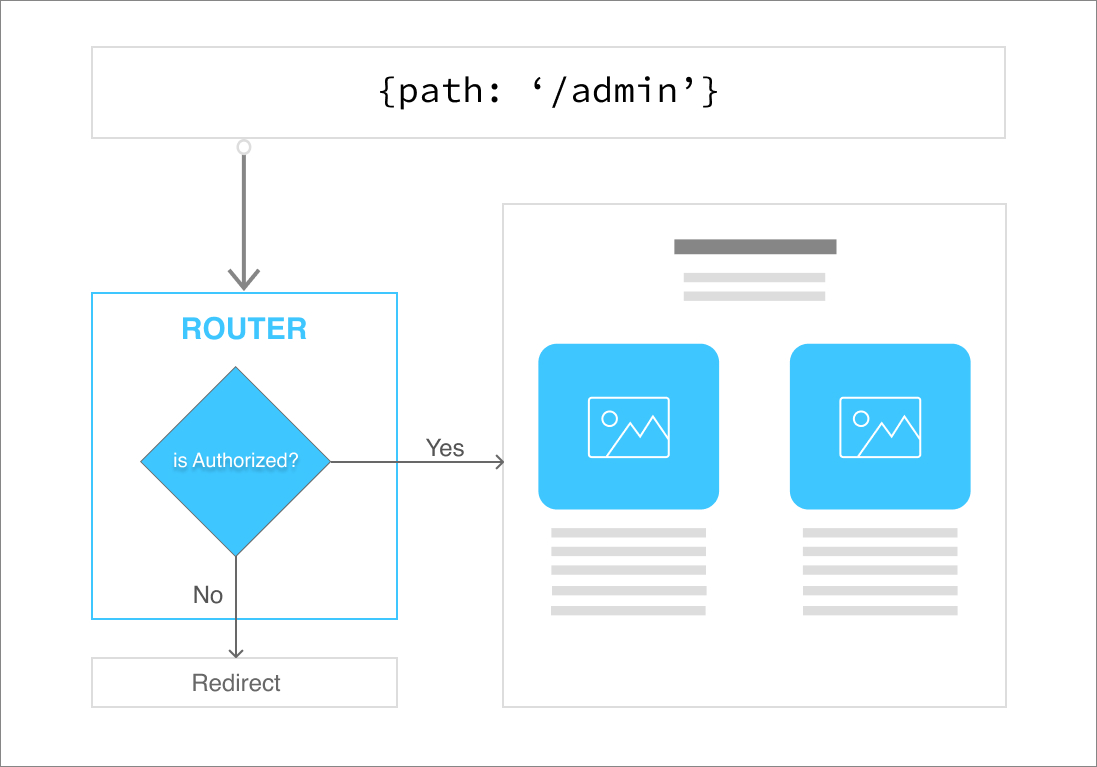
As you can see, there is an internal logic into your router configuration. This implementation can decide by looking at an authorization object, or any other state to proceed with rendering the associated view or perform a redirection otherwise.
Using Custom Route Actions
As a remember, our LitElement-based website is based on TypeScript and Vaadin Router for routing management.
Turns out that Vaadin Router allows configuring Custom Route Actions as a feature for advanced use cases.
This routing library provides a flexible API to customize the default route resolution rule. Each route may have an action property which defines an additional behavior about the route resolution:
const routes: Route[] = [
  {
    path: '/',
    component: 'lit-component',
    action: async () => {
      ...
    },
  }
]
This action function can receive a context and commands as parameters:
import { Commands, Context } from '@vaadin/router';

const routes: Route[] = [
  {
    path: '/',
    component: 'lit-component',
    action: async (context: Context, commands: Commands) => {
      ...
    },
  }
]
Let’s describe the context parameter and its properties:
| Property | Type | Description |
|---|---|---|
context.pathname |
string |
The pathname being resolved |
context.search |
string |
The search query string |
context.hash |
string |
The hash string |
context.params |
IndexedParams |
The route parameters object |
context.route |
Route |
The route that is currently being rendered |
context.next() |
function |
Function asynchronously getting the next route contents. Result: Promise<ActionResult> |
On other hand, the commands parameter contains a helper object with the following methods:
| Action | Result Type | Description |
|---|---|---|
commands.redirect('/path') |
RedirectResult |
Create and return a redirect command |
commands.prevent() |
PreventResult |
Create and return a prevent command |
commands.component('tag-name') |
ComponentResult |
Create and return a new HTMLElement that will be rendered into the router outlet |
Let’s put in practice both parameters in the next section.
Implementing Route Guards
Before implementing the route guards, let’s define the following structure:
|- src/
    |- about/
    |- blog/
    |- admin/
    |- analytics/
    |- shared/
        |- auth/
Now we can consider two approaches for its implementation:
A class-based solution
If you have an Object-Oriented(OO) background like me, you can think of implementing a class model that can be easy to extend and maintain in the future.
Let’s start with the AuthorizationService class definition. Create the following file shared/auth/authorization-service.ts and add these lines of code:
// authorization-service.ts

export class AuthorizationService {
  private readonly key = 'key'; // Identifier for your key/token

  public isAuthorized(): Promise<boolean> {
    const token = this.getToken();
    return new Promise((resolve, reject) => {
      resolve(token !== null); // try using resolve(true) for testing
    });
  }

  setToken(token: string): void {
    localStorage.setItem(this.key, token);
  }

  getToken(): string | null {
    return localStorage.getItem(this.key);
  }
}
As you can see, this class is ready to instantiate objects and you just need to call isAuthorized() function to know if that given user should access a route path or not. Since this can be an asynchronous operation, the function signature is ready to return a Promise.
The setToken and getToken functions allow storing a token value for a given user using Local Storage. Of course, this is a simple way to handle it.
You may consider other alternatives to store temporary values like Cookies, or even Session Storage. Remember, It’s always good to have a good understanding about the pros and cons of every option.
Most probably you’ll need to provide a better way for token storage in a production-ready application.
Try using resolve(true) on your tests if you’re not adding a token through this file service.
Next, let’s create the AuthGuard class into shared/auth/auth-guard.ts file as follows:
// auth-guard.ts

import { Commands, Context, RedirectResult } from '@vaadin/router';
import { AuthorizationService } from './authorization-service';
import { PageEnabled } from './page-enabled';

export class AuthGuard implements PageEnabled {

  private authService: AuthorizationService;

  constructor() {
    this.authService = new AuthorizationService();
  }

  public async pageEnabled(context: Context, commands: Commands, pathRedirect?: string): Promise<RedirectResult | undefined> {
    const isAuthenticated = await this.authService.isAuthorized();

    if(!isAuthenticated) {
      console.warn('User not authorized', context.pathname);
     return commands.redirect(pathRedirect? pathRedirect: '/');
    }

    return undefined;
  }
}
This AuthGuard implementation expects to create an internal instance from AuthorizationService to validate the access through the pageEnabled function.
Also, this class needs to implement the PageEnabled interface defined into /shared/auth/page-enabled.ts:
//page-enabled.ts

import { Commands, Context, RedirectResult } from '@vaadin/router';

export interface PageEnabled {
  pageEnabled(
    context: Context,
    commands: Commands,
    pathRedirect?: string
  ): Promise<RedirectResult | undefined>;
}
This interface can act as a contract for every Auth Guard to be added to routing configurations.
Finally, let’s add the route configurations for the Analytics page:
// index.ts
import { AuthGuard } from './shared/auth/auth-guard';

const routes: Route[] = [
  {
    path: 'analytics',
    component: 'lit-analytics',
    action: async (context: Context, commands: Commands) => {
      return await new AuthGuard().pageEnabled(context, commands, '/blog');
    },
    children: [
      {
        path: '/', // Default component view for /analytics route
        component: "lit-analytics-home",
        action: async () => {
          await import('./analytics/analytics-home');
        },
      },
      {
        path: ':period', // /analytics/day, /analytics/week, etc
        component: 'lit-analytics-period',
        action: async () => {
          await import('./analytics/analytics-period');
        },
      },
    ]
  },
];
If you pay attention to the action parameter, the function will create a new AuthGuard instance and it’s going to verify if the current user can access to /analytics route and its children.
A function-based solution
In case you’re using a JavaScript approach with no classes or want to add a single function to implement an Auth Guard, then you can create it as follows:
// auth-guard.ts

export async function authGuard(context: Context, commands: Commands) {
  const isAuthenticated = await new AuthorizationService().isAuthorized();

    if(!isAuthenticated) {
      console.warn('User not authorized', context.pathname);
     return commands.redirect('/');
    }

    return undefined;
}
The main difference with the previous example is that this function does not support the additional parameter configures the redirection path. However, this function would be easier to use in the route configuration:
// index.ts
import { authGuard } from './shared/auth/auth-guard';

const routes: Route[] = [
  {
    path: 'analytics',
    component: 'lit-analytics',
    action: authGuard, // authGuard function reference
    children: [
      ...
    ]
  },
];
Once finished, try to load either http://localhost:8000/analytics or http://localhost:8000/analytics/month to see the next result when you’re not authorized:
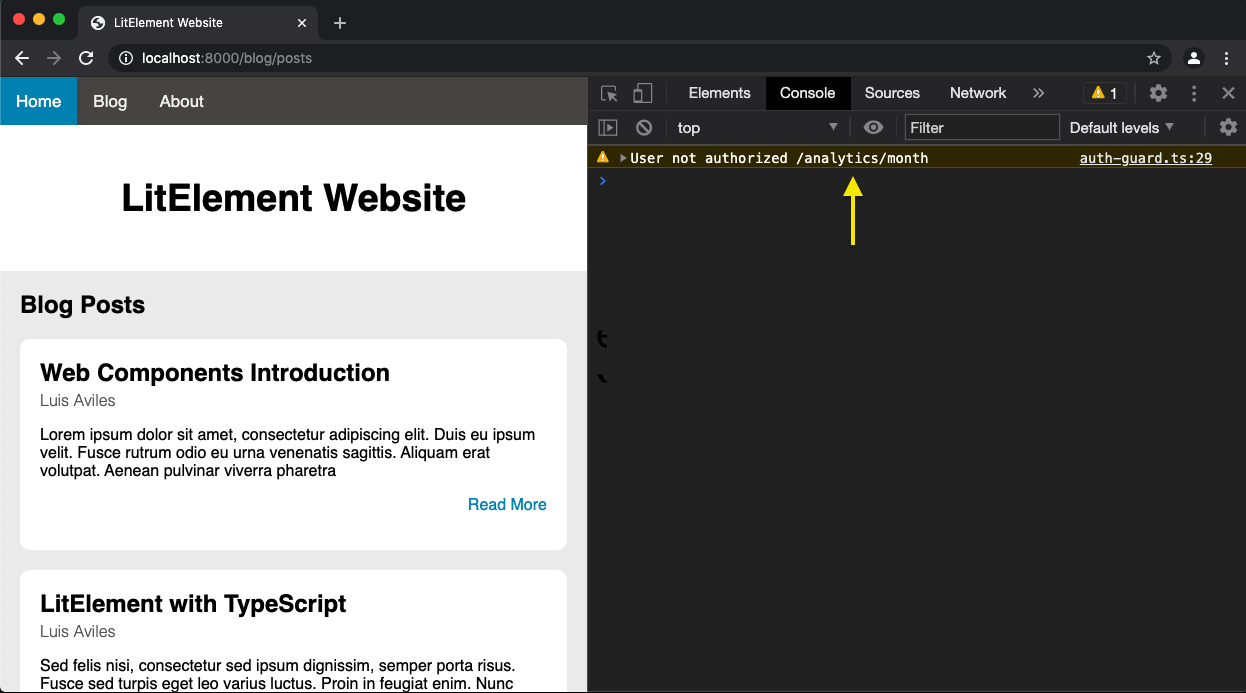
In this case, the user got redirected to /blog path.
Otherwise, you may be able to access those routes(Remember to change resolve(token !== null) by resolve(true) on authorization-service.ts file to verify).
Now you’re ready to use an Auth Guard for a single or multiple routes!
Source Code Project
Find the complete project in the GitHub repository: https://github.com/luixaviles/litelement-website. Do not forget to give it a star ⭐️ and play around with the code.
You can follow me on Twitter and GitHub to see more about my work.