Build your First PaLM API Powered Chatbot with Angular
Aug 24, 2023 · 8 minutes read · Follow @luixaviles
Chatbot applications have become a trend in the past months due to the introduction of natural language processing technologies. And the good news for developers is we can start using these powerful APIs to build our applications.
In this blog post, we will understand how to build a Chatbot that leverages the Google PaLM API along with the Angular framework. The frontend application will allow the users to ask questions and receive comprehensive answers through PaLM’s natural language processing technology.
What is PaLM API?
As the documentation says:
The PaLM API allows developers to use state-of-the-art Large Language Models (LLMs), to build language applications
This means the PaLM API provides multiple text generation capabilities including Text and Chat applications.
In this post, we’ll be focused on the message generation using the chat service provided by the API.
How to Get an API Key for PaLM API
First, you’ll need to be logged-in on MakerSuite, then go to https://makersuite.google.com/app/apikey and click on the “Create API key in new project”. Just keep in mind that the PaLM API is currently in public preview and production applications are not supported yet.
Once the API key is created, it will be listed in the same page and you’ll be able to manage it in Google Cloud too.
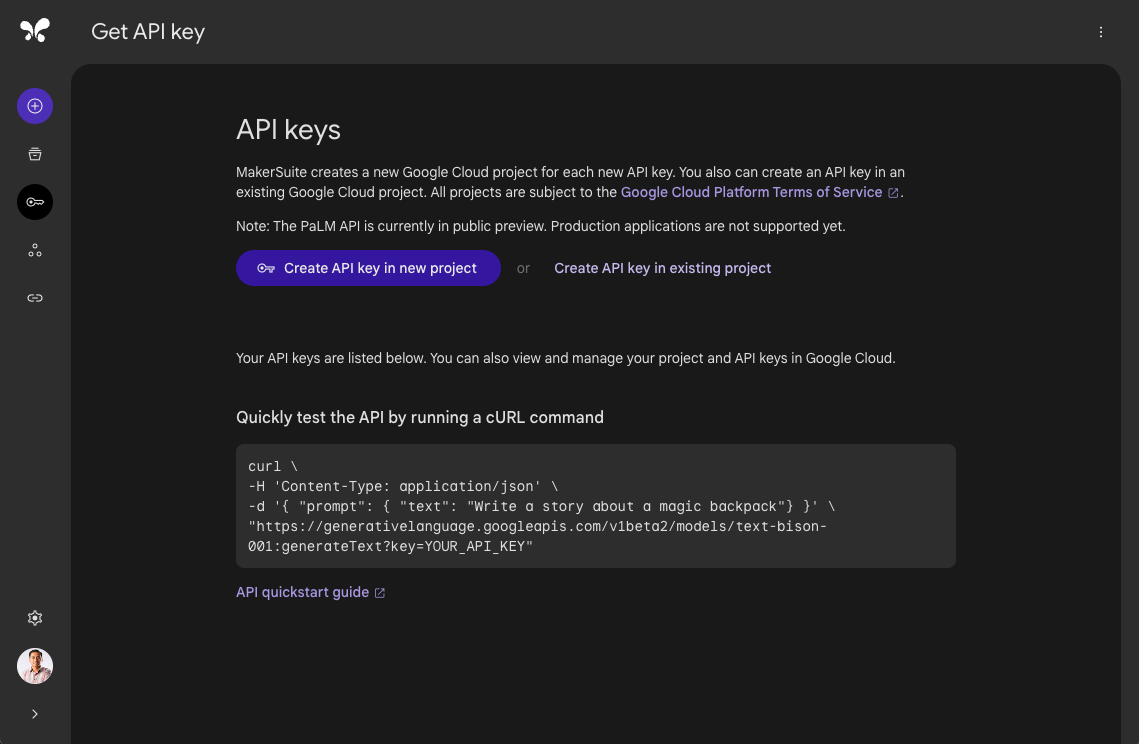
The quickest way to test the API using the brand new API key is running the following cURL command on your terminal:
curl \
-H 'Content-Type: application/json' \
-d '{ "prompt": { "text": "Write a joke about animals"} }' \
"https://generativelanguage.googleapis.com/v1beta2/models/text-bison-001:generateText?key=YOUR_API_KEY"
If the previous command runs fine, then you can copy your key since we’ll use it as an environment variable later.
Create the Backend Application
Let’s create a new server folder. And then run the following command:
npm init -y
This will initialize an NPM project and creates the package.json file.
Next, let’s install a couple of packages before starting to code on the server side.
npm install google-auth-library @google-ai/generativelanguage dotenv express
In this case, we’ll use the PaLM Node.js SDK to have access to Google’s latest large language models. This is done by the use of google-auth-library and @google-ai/generativelanguage packages.
The package dotenv will help with the access to an environment variable file that contains our created API Key. Let’s create the .env file for that purpose:
API_KEY=$YOUR_API_KEY
For this sample application, we’ll create an index.js file with the following content:
// index.js

const express = require("express");
const cors = require("cors");
require('dotenv').config()

const { DiscussServiceClient } = require("@google-ai/generativelanguage");
const { GoogleAuth } = require("google-auth-library");

const app = express();
const port = 3000;
const MODEL_NAME = "models/chat-bison-001";
const API_KEY = process.env.API_KEY;
const client = new DiscussServiceClient({
  authClient: new GoogleAuth().fromAPIKey(API_KEY),
});

const CONTEXT = "Respond to all questions with a rhyming poem.";
const EXAMPLES = [
  {
    input: { content: "What is the capital of California?" },
    output: {
      content: `If the capital of California is what you seek,
Sacramento is where you ought to peek.`,
    },
  },
];

let messages = [];

app.use(express.json());
app.use(
  cors({
    origin: "*",
  })
);

app.post("/api/chatbot", async (req, res) => {
  const requestData = req.body;

  if (requestData && requestData.message) {
    const message = requestData.message;
    messages.push({ content: message });

    const result = await client.generateMessage({
      model: MODEL_NAME,
      prompt: {
        context: CONTEXT,
        examples: EXAMPLES,
        messages,
      },
    });

    const messageResult = result[0].candidates[0].content;
    messages.push({ content: messageResult });

    res.json({ message: messageResult, agent: "chatbot" });
  } else {
    res.status(400).json({ error: "Content not provided" });
  }
});

app.listen(port, () => {
  console.log(`Server is running on port ${port}`);
});
The previous script will create a POST endpoint /api/chatbot to be used to interact with the PaLM API.
According Google, the chat service is designed for interactive, multi-run and context-aware conversations. This means you can provide a context along with examples of conversations to be followed by the model.
The messages variable is used to contine a conversation after an initial prompt message. So, it’s important to append the returned candidate message as part of the next prompt.
Create the Angular Application
Let’s create a project from scratch using the Angular CLI tool.
ng new chatbot-angular-palm --prefix corp --style css --skip-tests --no-routing --standalone
This command will initialize a base project using some configuration options:
--prefix corp. It defines a prefix to be applied to the selectors for created components(corpin this case). The default value isapp.--style css. The file extension for the styling files.--skip-tests. it avoids the generations of the.spec.tsfiles, which are used for testing.--no-routing. No routing module will be generated, since we’ll work in a single component for the demo app.--standalone. The app created will be based on the recent standalone API, without the creation of Modules.
Now we can add the Angular Material components.
ng add @angular/material
Creating the Model and the Service
Let’s create an abstraction for the chat messages we’ll send and receive in the application. We can do that creating a chat-content.interface.ts with the following code:
// chat-content.interface.ts

export interface ChatContent {
    agent: 'user' | 'chatbot';
    message: string;
    loading?: boolean;
}
Next, we’ll define an Angular service that allows the interaction with the API endpoint defined on the backend layer. You can generate that file using an Angular CLI command.
ng generate service chat
And then puth the following code in the new file:
// chat.service.ts

import { Injectable } from '@angular/core';
import { HttpClient } from '@angular/common/http';
import { Observable } from 'rxjs';
import { ChatContent } from './chat-content.interface';

@Injectable({
  providedIn: 'root',
})
export class ChatService {
  constructor(private httpClient: HttpClient) { }

  chat(chatContent: ChatContent): Observable<ChatContent> {
    return this.httpClient.post<ChatContent>('http://localhost:3000/api/chatbot', chatContent);
  }
}
Building an Angular Pipe Helper
Once you start to interact with the PaLM API you will notice that the output messages can include escape sequence characters as \n or \r.
To handle those characters and allow a correct rendering in the app, we can create a custom pipe with the help of the Angular CLI generator.
ng generate pipe line-break
Put the following source code in the brand new file.
// line-break.pipe.ts

import { Pipe, PipeTransform } from '@angular/core';

@Pipe({
  name: 'lineBreak',
  standalone: true
})
export class LineBreakPipe implements PipeTransform {

  transform(value: string, ...args: unknown[]): unknown {
    return value.replace(/(?:\r\n|\r|\n)/g, '<br/>');
  }

}
That pipe will process the string messages and will replace any escape character found using a single line break <br> element.
Building the Component
We’ll create a simple user interface with the help of the Angular Material components in a single Angular component.
Let’s work on the app.component.ts file first.
//app.component.ts

import { Component } from '@angular/core';
import { CommonModule } from '@angular/common';
import { FormsModule } from '@angular/forms';

import { MatIconModule } from '@angular/material/icon';
import { MatCardModule } from '@angular/material/card';
import { MatInputModule } from '@angular/material/input';
import { MatButtonModule } from '@angular/material/button';
import { MatFormFieldModule } from '@angular/material/form-field';
import { ChatService } from './chat.service';
import { ChatContent } from './chat-content.interface';
import { LineBreakPipe } from './line-break.pipe';
import { finalize } from 'rxjs';

@Component({
  selector: 'corp-root',
  standalone: true,
  imports: [
    CommonModule,
    MatIconModule,
    MatCardModule,
    MatInputModule,
    MatButtonModule,
    MatFormFieldModule,
    FormsModule,
    LineBreakPipe,
  ],
  templateUrl: './app.component.html',
  styleUrls: ['./app.component.css'],
})
export class AppComponent {
  message = '';

  contents: ChatContent[] = [];

  constructor(private chatService: ChatService) {}

  sendMessage(message: string): void {
    const chatContent: ChatContent = {
      agent: 'user',
      message,
    };

    this.contents.push(chatContent);
    this.contents.push({
      agent: 'chatbot',
      message: '...',
      loading: true,
    });

    this.message = '';
    this.chatService
      .chat(chatContent)
      .pipe(
        finalize(() => {
          const loadingMessageIndex = this.contents.findIndex(
            (content) => content.loading
          );
          if (loadingMessageIndex !== -1) {
            this.contents.splice(loadingMessageIndex, 1);
          }
        })
      )
      .subscribe((content) => {
        this.contents.push(content);
      });
  }
}
Since the Angular app was created using the Standalone API(No Modules are used), we can import the external dependencies through the imports property on the @Component decorator.
Once the ChatService is injected, the component is ready to send and capture the incoming messages. This is done by the sendMessage method on the TypeScript class.
Now it’s time to work on the app.component.html file.
<div class="app-container">
  <div class="chat-container">
    <div class="message-container" *ngIf="contents.length === 0">
      <p class="message">
        Welcome to PaLM ChatBot <br />
        Write a text to start.
      </p>
    </div>
    <div
      *ngFor="let content of contents"
      class="chat-message"
      [ngClass]="content.agent"
    >
      <img [src]="'assets/avatar-' + content.agent + '.png'" class="avatar" />
      <div class="message-details">
        <p
          class="message-content"
          [ngClass]="{ loading: content.loading }"
          [innerHTML]="content.message | lineBreak"
        ></p>
      </div>
    </div>
  </div>

  <div class="chat-footer-container">
    <mat-form-field class="chat-input">
      <input
        placeholder="Send a message"
        matInput
        #inputMessage
        [(ngModel)]="message"
        (keyup.enter)="sendMessage(message)"
      />
    </mat-form-field>
    <button mat-icon-button color="primary" (click)="sendMessage(message)">
      <mat-icon>send</mat-icon>
    </button>
  </div>
</div>
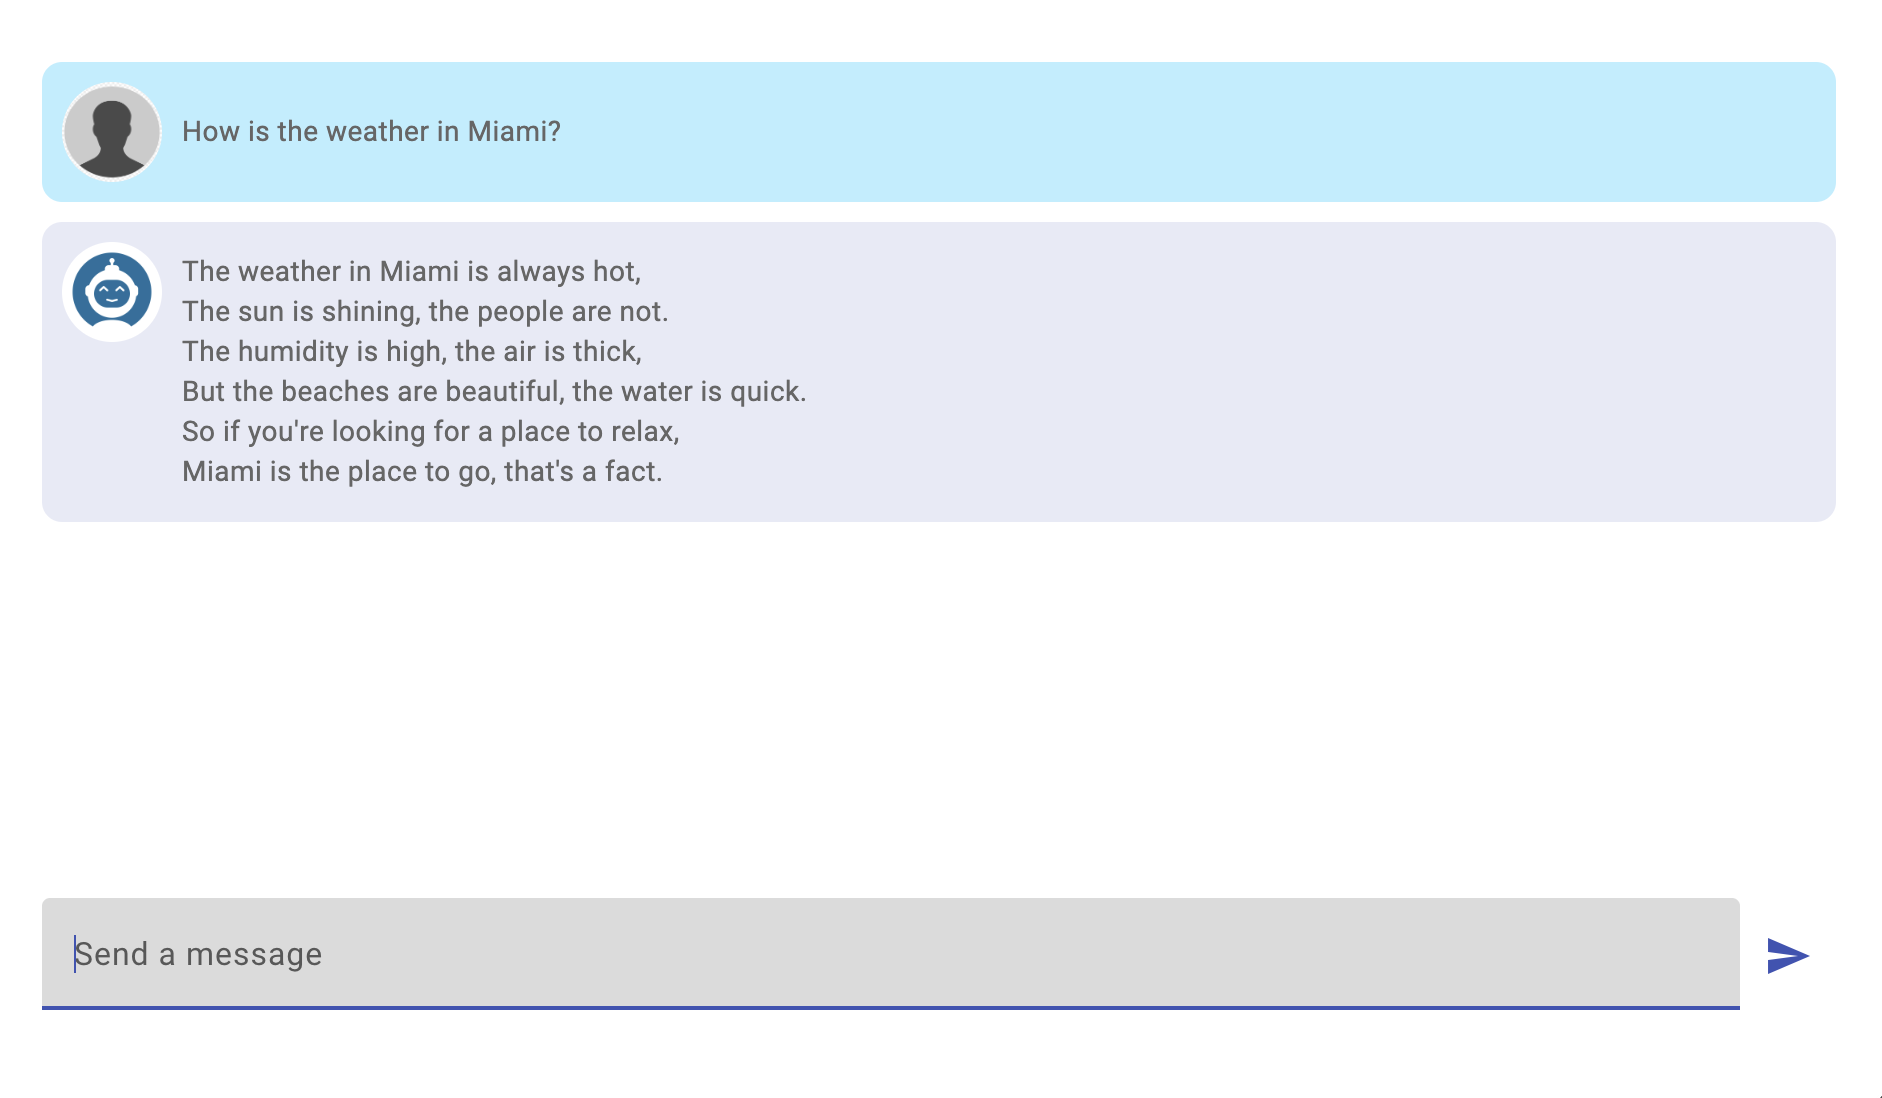
The HTML template expects to have all the messages on the contents variable. And, according to the agent attribute it will render a user or bot as the avatar.
If no messages are beign processed yet, then a default message will be rendered.
Source Code of the Project
Find the complete project in this GitHub repository: chatbot-angular-palm. Do not forget to give it a star ⭐️ and play around with the code.
Conclusion
In this step-by-step tutorial we demonstrated how to build a simple ChatBot application using Angular and the PaLM API. Keep in mind that you’ll need to have access to Google MakerSuite first before starting you generate your API Key.
If you liked this post, be sure to share it with your friends.
You can follow me on Twitter and GitHub to see more about my work.
Thank you for reading!
— Luis Aviles