Build your First Gemini Powered Chatbot with Angular and NestJS
Mar 1, 2024 · 12 minutes read · Follow @luixaviles
The rise of Natural Language Processing(NLP) has opened up exciting opportunities for developers, allowing them to create engaging and interactive chatbot applications.
In this blog post, we will guide you through the process of creating a chatbot application from scratch using the TypeScript programming language. The project will be based on the latest version of the Angular framework for the frontend and we will use NestJS for creating the API services through the existing Gemini API capabilities for chat and text generation.
What is Gemini API?
The Gemini API offers developers a powerful tool for building applications that interact with the world through natural language. The API implementation acts as a bridge to a large language model(LLM), allowing you to access the natural language processing(NLP) capabilities.
With Gemini, you can:
- Generate creative text: summaries, translations, code, template emails, letters, and more.
- Answer users’ questions: Provide insightful and comprehensive responses to complex queries.
- Engage in conversations: Participate in natural-feeling discussions, based on a meaningful context.
The Gemini models are built from the ground up for multimodality and that means they can help with reasoning across text, images, audio, video, and code.
Learn more about Gemini here.
Get an API Key for Gemini API
Before getting started with code, you’ll need to generate an API Key for the project. This needs to be done on Google AI Studio.
Once you get access to Google AI Studio, click on the “Get API Key” button on the left side to be redirected to the API keys view. Then, click on the “Create API Key” button to generate your first API key.

As you may find on the same page, the quickest way to test the API using the brand-new API key is by running the following cURL command on your terminal:
curl \
  -H 'Content-Type: application/json' \
  -d '{"contents":[{"parts":[{"text":"Write a story about a magic backpack"}]}]}' \
  -X POST https://generativelanguage.googleapis.com/v1beta/models/gemini-pro:generateContent?key=YOUR_API_KEY
Make sure to save the API key in a safe place since we’ll use it as an environment variable later.
⚠️ This API Key should not be versioned along with your source code! ⚠️
Create the Project Repository
In this case, we’ll use Nx to create the project repository from scratch. This will be a mono repository with the support of two applications: A client app based on Angular and a server app based on NestJS.
npx create-nx-workspace@latest --preset apps \
--name gemini-angular-nestjs \
--nxCloud skip
That’s a fast way to create an initial Nx workspace. You can see more options for create-nx-workspace here.
Create a Shared Model library
One practical way to define the shared code between apps is a new library. Let’s create a data-model library to define the common types for the project.
nx generate @nx/js:library --name=data-model \
 --unitTestRunner=none \
 --directory=libs/data-model \
 --importPath=data-models \
 --publishable=true \
 --projectNameAndRootFormat=as-provided \
Next, let’s define a chat-content.ts file under libs/data-model/src/lib as follows:
export interface ChatContent {
    agent: 'user' | 'chatbot';
    message: string;
}
That will be the base model to be used on the future Angular app and NestJS code.
Create the Server Application
It’s time to create the server folder as part of the new Nx workspace. Let’s enter the newly new created folder:
cd gemini-angular-nestjs
Next, let’s install the NestJS application schematics:
npm install --save-dev @nx/nest
Now we can move forward creating the NestJS application using the following command:
nx generate @nx/nest:application \
--name server \
--e2eTestRunner none
The parameter name sets the name of the application where the NestJS code will be implemented. You can find other options for NestJS apps here.
After finishing the previous command, run the server application.
nx serve server
Set the Environment Variable
Create a .env file under the brand-new server folder. The environment file should have the API key you just created following the next example:
API_KEY=$YOUR_API_KEY
Creating the Chat and Text Services
Initially, we’ll add the support of text generation and multi-turn conversations(chat) using the Gemini API.
For a Node.js context, you need to install the GoogleGenerativeAI package:
npm install @google/generative-ai
Let’s create two services to handle both functionalities:
nx generate @nx/nest:service --name=chat
nx generate @nx/nest:service --name=text
Open the chat.service.ts file and put the following code:
import { Injectable } from '@nestjs/common';
import {
  ChatSession,
  GenerativeModel,
  GoogleGenerativeAI,
} from '@google/generative-ai';

import { ChatContent } from 'data-model';

@Injectable()
export class ChatService {
  model: GenerativeModel;
  chatSession: ChatSession;
  constructor() {
    const genAI = new GoogleGenerativeAI(process.env.API_KEY);
    this.model = genAI.getGenerativeModel({ model: 'gemini-pro' });
    this.chatSession = this.model.startChat({
      history: [
        {
          role: 'user',
          parts: `You're a poet. Respond to all questions with a rhyming poem.
            What is the capital of California?
          `,
        },
        {
          role: 'model',
          parts:
            'If the capital of California is what you seek, Sacramento is where you ought to peek.',
        },
      ],
    });
  }

  async chat(chatContent: ChatContent): Promise<ChatContent> {
    const result = await this.chatSession.sendMessage(chatContent.message);
    const response = await result.response;
    const text = response.text();

    return {
      message: text,
      agent: 'chatbot',
    };
  }
}
The class ChatService defines a model created through GoogleGenerativeAI constructor that needs to read the API Key.
The ChatSession object is needed to handle the multi-turn conversation. This object will store the conversation history for you. In order to initialize the chat, you can use the startChat() method and then set the initial context using the history property, which contains the first messages based on two roles: user and model.
The class method chat will take the chatContent object to register a new message from the user through sendMessage call. Then, the text value is extracted at the end before returning a ChatContent object for the client application.
Now, open the text.service.ts file and put the following content:
import { Injectable } from '@nestjs/common';
import {
    GenerativeModel,
    GoogleGenerativeAI,
  } from '@google/generative-ai';
import { ChatContent } from 'data-model';

@Injectable()
export class TextService {
    model: GenerativeModel;

    constructor() {
        const genAI = new GoogleGenerativeAI(process.env.API_KEY);
        this.model = genAI.getGenerativeModel({ model: "gemini-pro"});
    }

    async generateText(message: string): Promise<ChatContent> {
        const result = await this.model.generateContent(message);
        const response = await result.response;
        const text = response.text();

        return {
          message: text,
          agent: 'chatbot',
        };
      }
}
The TextService class creates the model property through the GoogleGenerativeAI class that requires the API key. Observe that the gemini-pro model is used here too since it’s optimized for multi-turn converstaions and text-only input as the use case.
The generateText method will take the chatContent object to extract the text message and use the generateContent method from the model.
For the text generation use case, there’s no need to handle history as we did for the multi-turn conversations(chat service).
Update the App Controller
We already defined the code that uses the Gemini model for text generation and chat. Let’s create the POST endpoints for the backend application.
To do that, open the app.controller.ts file and set the following content:
// app.controller.ts

import { Controller, Get, Post, Body } from '@nestjs/common';

import { ChatContent } from 'data-model';
import { ChatService } from './chat.service';
import { TextService } from './text.service';

@Controller()
export class AppController {

  constructor(private readonly chatService: ChatService, private readonly textService: TextService) {}

  @Post('chat')
  chat(@Body() chatContent: ChatContent) {
    return this.chatService.chat(chatContent);
  }

  @Post('text')
  text(@Body() chatContent: ChatContent) {
    return this.textService.generateText(chatContent.message);
  }
}
The AppController class injects the ChatService and the TextService we created before.
Then, it uses the @Post decorators to create the /api/chat and the /api/text endpoints.
Create the Client Application
For the frontend application, we’ll need to create a client folder as part of the Nx workspace.
First, let’s install the Angular application schematics:
npm install --save-dev @nx/angular
Now, let’s create the Angular app with the following command:
nx generate @nx/angular:application client \
--style scss \
--prefix corp \
--routing \
--skipTests true \
--ssr false \
--bundler esbuild \
--e2eTestRunner none
The client application will use SCSS for styling and set the prefix for components as corp. You may find more details about the all options available here.
You can run the client application as follows:
nx serve client
Adding Angular Material
Let’s implement the UI using Angular Material components. We can add that support running the following commands:
npm install @angular/material
nx g @angular/material:ng-add --project=client
The latest command will perform changes on the project configuration while setting up the needed styles for Angular Material. Pay attention to the output to understand what changes were made in the project.
Create the Gemini Service
Before starting to implement the components, let’s create an Angular service to manage the HTTP communication for the client app.
nx generate @schematics/angular:service --name=gemini --project=client --skipTests=true
Open the gemini.service.ts file and put the following code:
import { Injectable } from '@angular/core';
import { HttpClient } from '@angular/common/http';
import { Observable } from 'rxjs';
import { ClientChatContent } from './client-chat-content';

@Injectable({
  providedIn: 'root',
})
export class GeminiService {
  constructor(private httpClient: HttpClient) { }

  chat(chatContent: ClientChatContent): Observable<ClientChatContent> {
    return this.httpClient.post<ClientChatContent>('http://localhost:3000/api/chat', chatContent);
  }

  generateText(message: string): Observable<ClientChatContent> {
    return this.httpClient.post<ClientChatContent>('http://localhost:3000/api/text', {message});
  }
}
The GeminiService class has two methods: chat and generateText.
- chat is used to send a chat message to the server. The chat message is sent as the body of the request.
- generateText is used to generate text based on a given prompt.
Create the Chat and Text Components
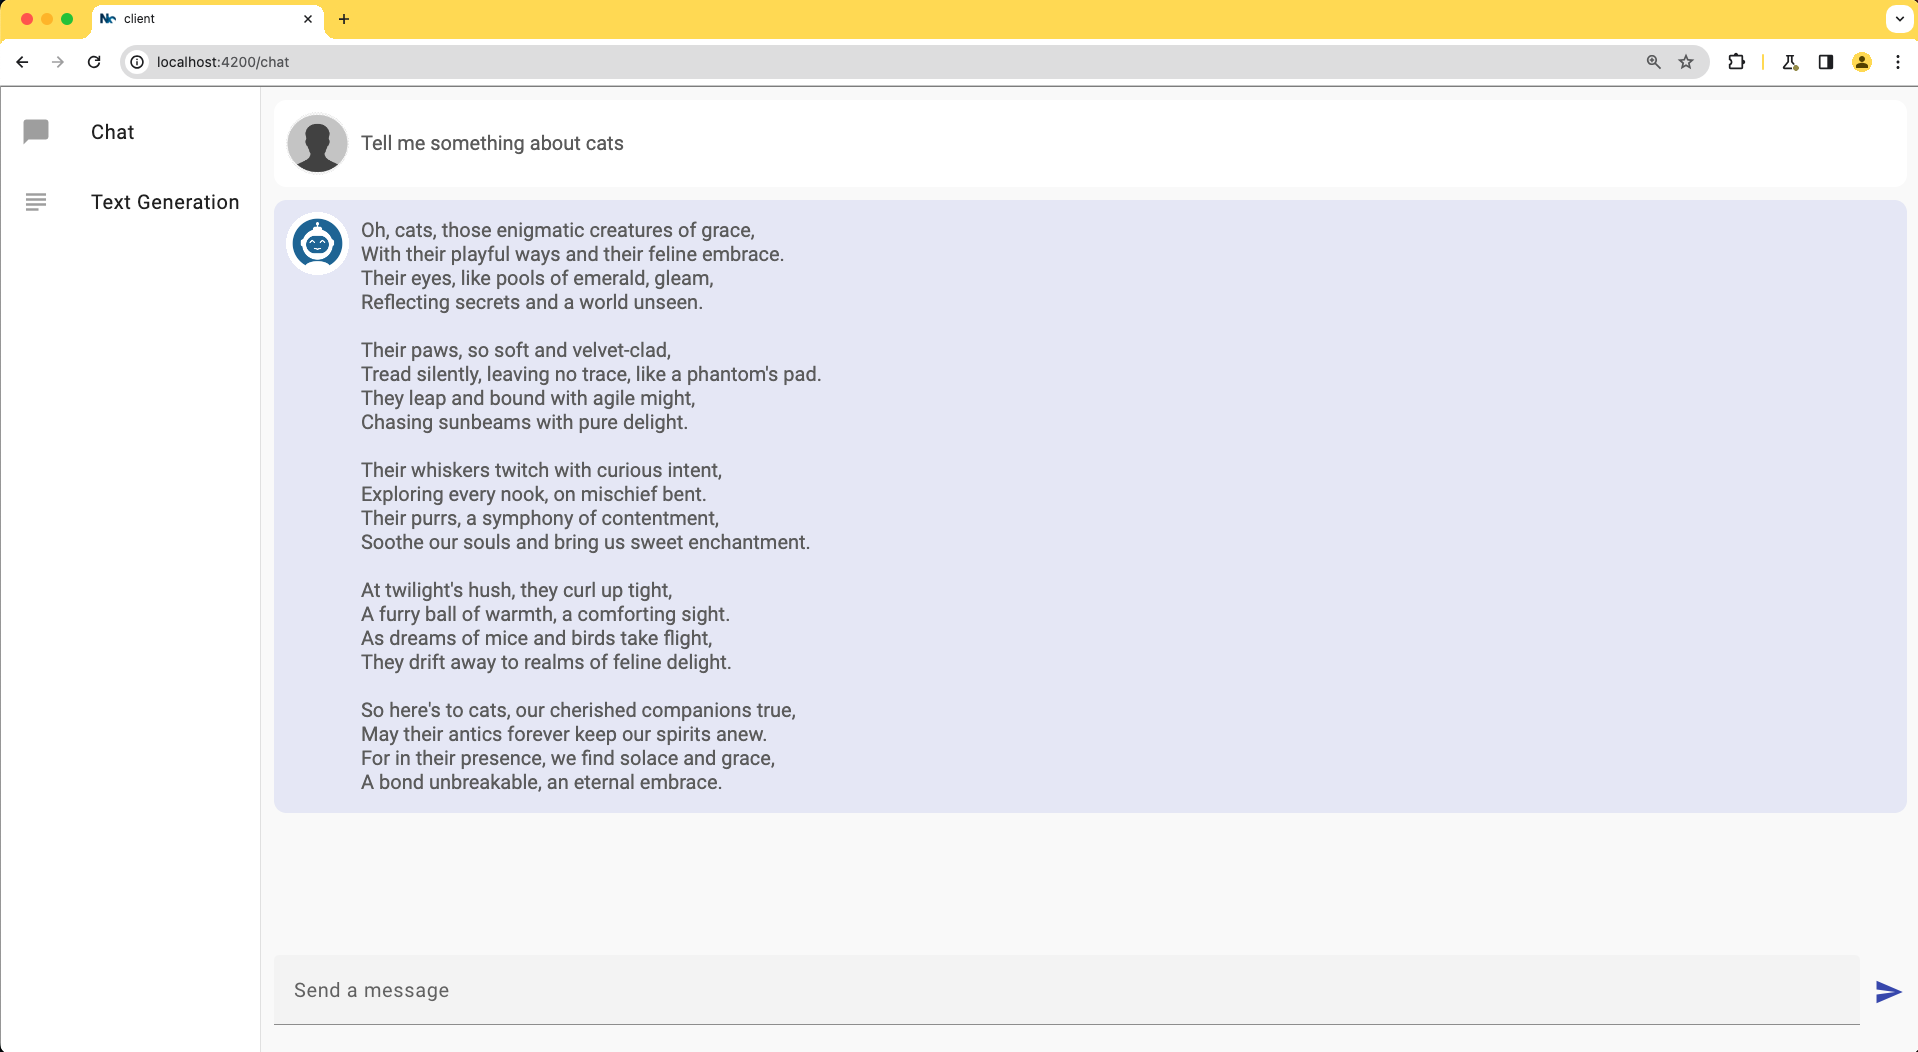
The Chat Component
It’s time to create the components needed for the text generation and the chat. Let’s start with the chat component:
npx nx generate @nx/angular:component \
--name=chat \
--directory=chat
--skipTests=true \
--style=scss
Open the chat.component.ts file and set the following TypeScript code:
import { Component } from '@angular/core';
import { CommonModule } from '@angular/common';
import { FormsModule } from '@angular/forms';

import { MatIconModule } from '@angular/material/icon';
import { MatInputModule } from '@angular/material/input';
import { MatButtonModule } from '@angular/material/button';
import { MatFormFieldModule } from '@angular/material/form-field';

import { GeminiService } from '../gemini.service';
import { LineBreakPipe } from '../line-break.pipe';
import { finalize } from 'rxjs';
import { ClientChatContent } from '../client-chat-content';


@Component({
  selector: 'corp-chat',
  standalone: true,
  imports: [
    CommonModule,
    MatIconModule,
    MatInputModule,
    MatButtonModule,
    MatFormFieldModule,
    FormsModule,
    LineBreakPipe,
  ],
  templateUrl: './chat.component.html',
  styleUrls: ['./chat.component.scss']
})
export class ChatComponent {
  message = '';

  contents: ClientChatContent[] = [];

  constructor(private geminiService: GeminiService) {}

  sendMessage(message: string): void {
    const chatContent: ClientChatContent = {
      agent: 'user',
      message,
    };

    this.contents.push(chatContent);
    this.contents.push({
      agent: 'chatbot',
      message: '...',
      loading: true,
    });

    this.message = '';
    this.geminiService
      .chat(chatContent)
      .pipe(
        finalize(() => {
          const loadingMessageIndex = this.contents.findIndex(
            (content) => content.loading
          );
          if (loadingMessageIndex !== -1) {
            this.contents.splice(loadingMessageIndex, 1);
          }
        })
      )
      .subscribe((content) => {
        this.contents.push(content);
      });
  }
}
The ChatComponent class defines two properties: message and contents. The input field defined in the template will bind to the message property since it’s a string value.
The constructor of the class injects an instance of GeminiService into the component. The GeminiService class is used to handle the chat functionality.
The sendMessage method is used to send a message to the API and a loading message is rendered while the request is in progress. Once a message is sent, it is added to the chat history.
Once the TypeScript logic is set, open the chat.component.html file and put the following code:
<div class="chat-container">
  <div class="message-container" *ngIf="contents.length === 0">
    <p class="message">
      Welcome to your Gemini ChatBot App <br />
      Write a text to start.
    </p>
  </div>
  <div
    *ngFor="let content of contents"
    class="chat-message"
    [ngClass]="content.agent"
  >
    <img [src]="'assets/avatar-' + content.agent + '.png'" class="avatar" />
    <div class="message-details">
      <p
        class="message-content"
        [ngClass]="{ loading: content.loading }"
        [innerHTML]="content.message | lineBreak"
      ></p>
    </div>
  </div>
</div>

<div class="chat-footer-container">
  <mat-form-field class="chat-input">
    <input
      placeholder="Send a message"
      matInput
      #inputMessage
      [(ngModel)]="message"
      (keyup.enter)="sendMessage(message)"
    />
  </mat-form-field>
  <button mat-icon-button color="primary" (click)="sendMessage(message)">
    <mat-icon>send</mat-icon>
  </button>
</div>
The template defines the HTML structure and layout for the chat interface. A welcome message is displayed when there are no messages yet.
The main chat container section will display each message through the ngFor directive based on the contents array.
The chat footer container is the place where the user can input and send messages.
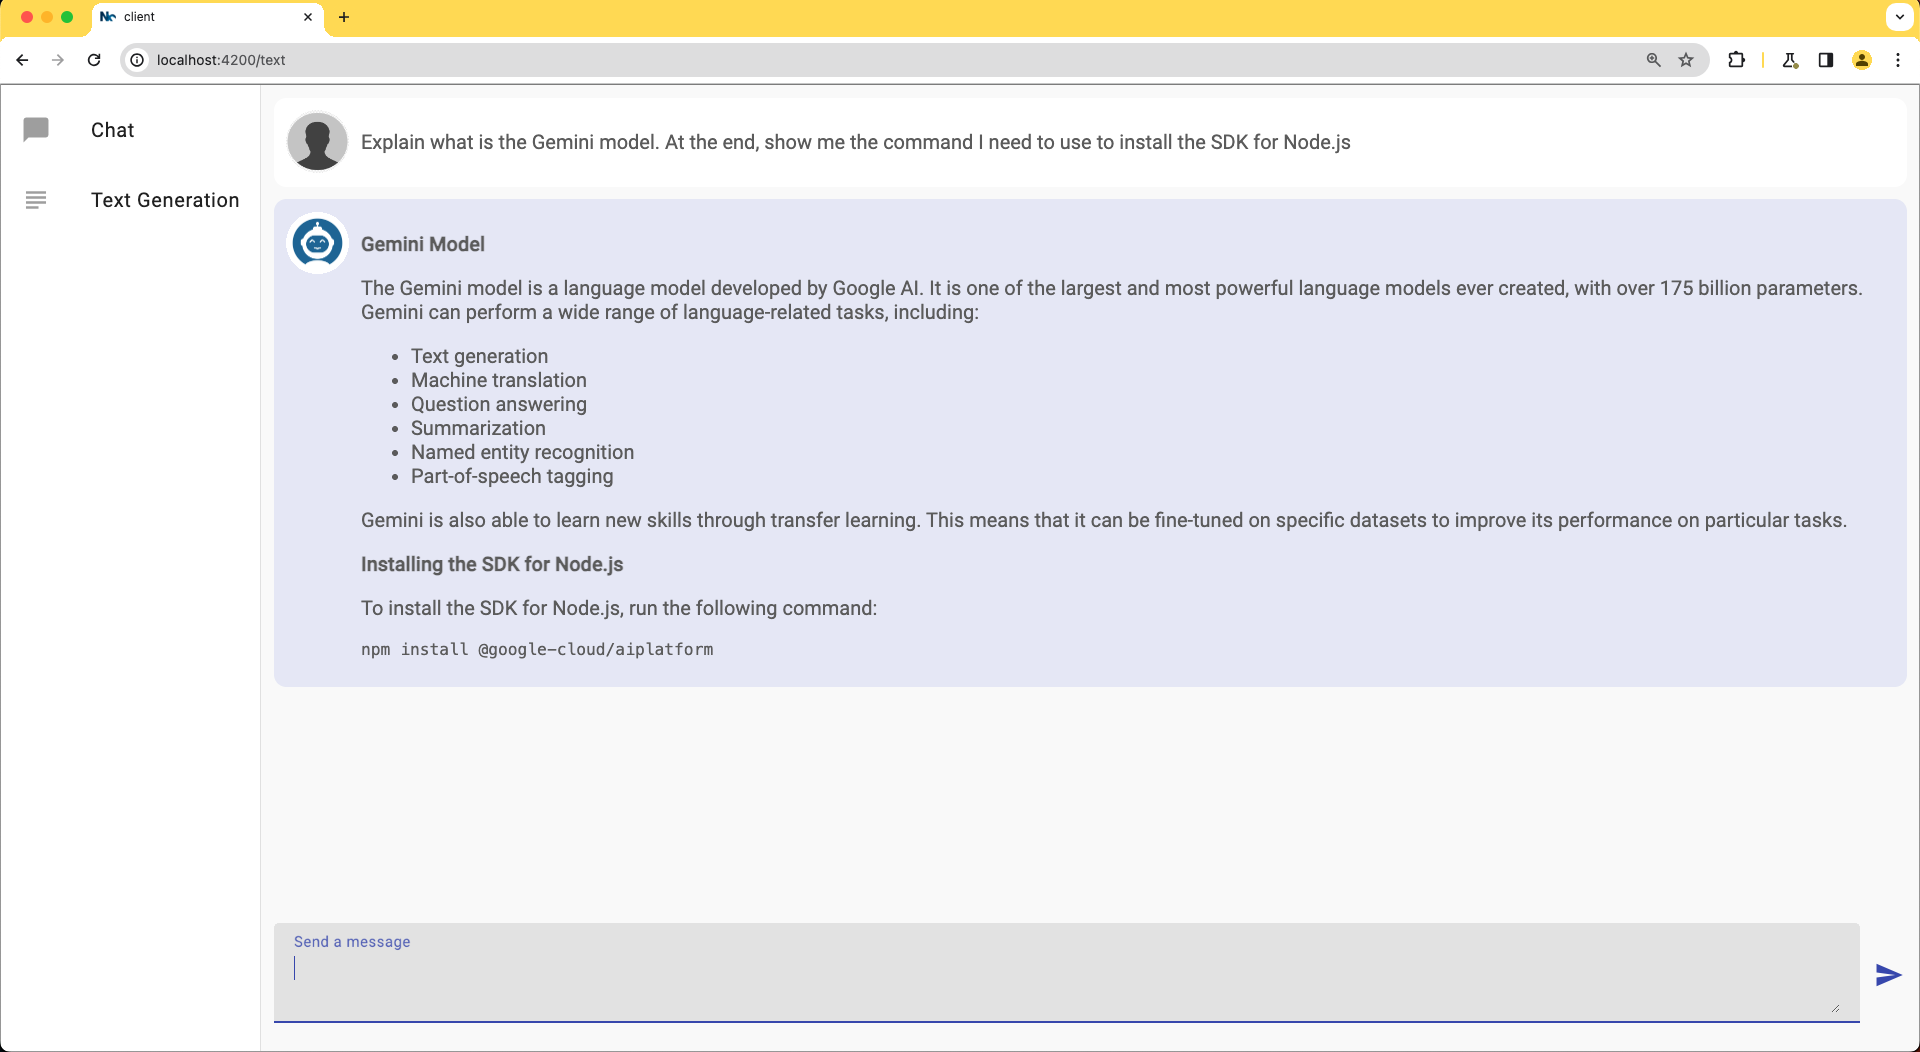
The Text Component
Let’s create the component for the text generation:
npx nx generate @nx/angular:component \
--name=text \
--directory=text
--skipTests=true \
--style=scss
Open the text.component.ts file and put the following code:
import { Component } from '@angular/core';
import { CommonModule } from '@angular/common';
import { FormsModule } from '@angular/forms';

import { MatIconModule } from '@angular/material/icon';
import { MatInputModule } from '@angular/material/input';
import { MatButtonModule } from '@angular/material/button';
import { MatFormFieldModule } from '@angular/material/form-field';

import { MarkdownModule } from 'ngx-markdown';

import { GeminiService } from '../gemini.service';
import { ClientChatContent } from '../client-chat-content';
import { LineBreakPipe } from '../line-break.pipe';
import { finalize } from 'rxjs';


@Component({
  selector: 'corp-text',
  standalone: true,
  imports: [
    CommonModule,
    MatIconModule,
    MatInputModule,
    MatButtonModule,
    MatFormFieldModule,
    FormsModule,
    LineBreakPipe,
    MarkdownModule
  ],
  templateUrl: './text.component.html',
  styleUrls: ['./text.component.scss']
})
export class TextComponent {
  message = '';
  contents: ClientChatContent[] = [];

  constructor(private geminiService: GeminiService) {}

  generateText(message: string): void {
    const chatContent: ClientChatContent = {
      agent: 'user',
      message,
    };

    this.contents.push(chatContent);
    this.contents.push({
      agent: 'chatbot',
      message: '...',
      loading: true,
    });

    this.message = '';
    this.geminiService
      .generateText(message)
      .pipe(
        finalize(() => {
          const loadingMessageIndex = this.contents.findIndex(
            (content) => content.loading
          );
          if (loadingMessageIndex !== -1) {
            this.contents.splice(loadingMessageIndex, 1);
          }
        })
      )
      .subscribe((content) => {
        this.contents.push(content);
      });
  }
}
The previous code defines an Angular component called TextComponent. It has two properties message and contents as the ChatComponent does. The behavior is similar and the only difference here is the generateText method is used to generate text based on a given message(user’s prompt).
Next, open the text.component.html file and set the following code:
<div class="chat-container">
  <div class="message-container" *ngIf="contents.length === 0">
    <p class="message">
      Welcome to your Gemini App <br />
      Write an instruction to start.
    </p>
  </div>
  <div
    *ngFor="let content of contents"
    class="chat-message"
    [ngClass]="content.agent"
  >
    <img [src]="'assets/avatar-' + content.agent + '.png'" class="avatar" />
    <div class="message-details">
      <p *ngIf="content.loading"
        class="message-content"
        [ngClass]="{ loading: content.loading }"
        [innerHTML]="content.message | lineBreak"
      ></p>
      <markdown *ngIf="!content.loading"
        class="variable-binding message-content"
        [data]="content.message"
      ></markdown>
    </div>
  </div>
</div>

<div class="chat-footer-container">
  <mat-form-field class="chat-input">
    <mat-label>Send a message</mat-label>
    <textarea
      matInput
      #inputMessage
      [(ngModel)]="message"
      (keyup.enter)="generateText(message)"
    ></textarea>
  </mat-form-field>
  <button mat-icon-button color="primary" (click)="generateText(message)">
    <mat-icon>send</mat-icon>
  </button>
</div>
This template is very similar to the Chat component. However, it uses the markdown element to render code and text formatting that may come as part of the generated text.
To make it work, we’ll need to install the ngx-markdown and marked packages:
npm install --save ngx-markdown marked
Also, you will need to update the app.config.ts file and import the MarkdownModule support:
import { MarkdownModule } from 'ngx-markdown';

export const appConfig: ApplicationConfig = {
  providers: [
    provideRouter(appRoutes),
    provideAnimationsAsync(),
    provideHttpClient(),
    importProvidersFrom([
      MarkdownModule.forRoot()
  ])
  ],
};
Source Code of the Project
Find the complete project in this GitHub repository: gemini-angular-nestjs. Do not forget to give it a star ⭐️ and play around with the code.
Conclusion
In this step-by-step tutorial, we demonstrated how to build a web application from scratch with the ability to generate text and have multi-turn conversations using the Gemini API. The Nx workspace is ready to add shared code, or even add more applications as the project grows.
If you liked this post, be sure to share it with your friends.
You can follow me on Twitter and GitHub to see more about my work.
Thank you for reading!
— Luis Aviles