Using Gemini Pro Vision for Image Processing using Angular and NestJS
Mar 7, 2024 · 9 minutes read · Follow @luixaviles
In a previous post, I explained the main aspects of building a full-stack web application from scratch and explored current capabilities for chat and text generation of Gemini models.
In this blog post, we will use the same Nx workspace as a starting point and will add the ability to process images using the Gemini Pro vision model.
If you want to code along this tutorial, make sure to clone or download the code using the tag v0.1, which can be found here.
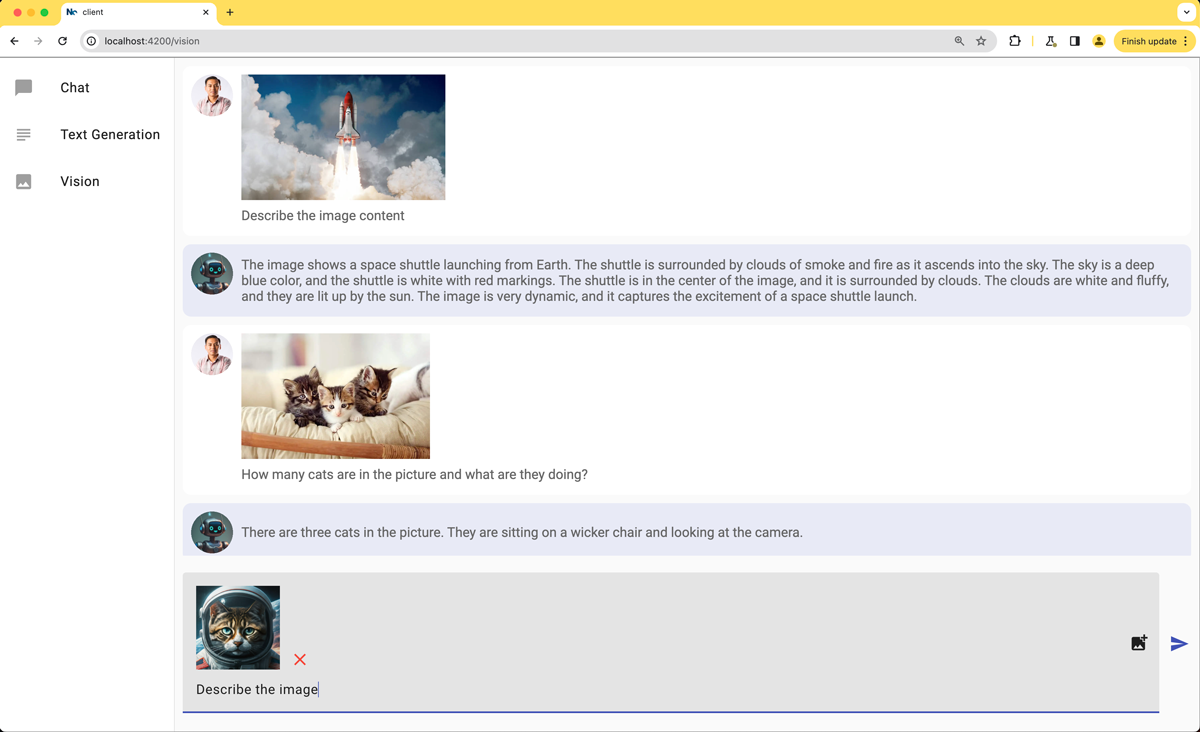
In the end, you may get an application that allows uploading images along with a text prompt to be sent to the Gemini model as the following screen shows:
Handle the Image File Upload on the Server
Let’s start creating a new NestJS service using the following command:
nx generate @nx/nest:service --name=vision --nameAndDirectoryFormat=as-provided --unitTestRunner=none
Open the vision.service.ts file and add this code:
import { Injectable } from '@nestjs/common';
import {
    GenerativeModel,
    GoogleGenerativeAI,
    InlineDataPart,
  } from '@google/generative-ai';
import { ChatContent } from 'data-model';

@Injectable()
export class VisionService {
    model: GenerativeModel;

    constructor() {
        const genAI = new GoogleGenerativeAI(process.env.API_KEY);
        this.model = genAI.getGenerativeModel({ model: "gemini-pro-vision"});
    }

    async vision(message: string, file: Express.Multer.File): Promise<ChatContent> {
        const imageDataPart: InlineDataPart = {
            inlineData: {
              data: file.buffer.toString('base64'),
              mimeType: file.mimetype,
            },
          };
        const result = await this.model.generateContent([message, imageDataPart]);
        const response = await result.response;
        const text = response.text();

        return {
          message: text,
          agent: 'chatbot',
        };
      }
}
The previous code may not work before installing the Multer typings package:
npm install -D @types/multer
With this package, we can now use the Express.Multer.File type.
Also, make sure to include Multer as part of the required types on the compilerOptions section of your tsconfig.json file(server application).
{
  ...
  "compilerOptions": {
    "esModuleInterop": true,
    "types": ["Multer"]
  }
}
Now, let’s understand what’s happening in the service implementation.
- The constructor method will initialize an instance of
GoogleGenerativeAIusing the API key that comes as an environment variable. Then, thegemini-pro-visionmodel is used to initialize the model property, which is aGenerativeModelinstance. - The
visionmethod is used to generate content based on a given message and an image file.- First, it creates an
InlineDataPartobject that contains the image data in base64 format and the MIME type of the image. This object can be sent to the model through thegenerateContentmethod. - The method returns the generated text.
- First, it creates an
Handle the HTTP POST Request
We got the service implementation with the main logic to handle the incoming image file along with the text. It’s time to create a method that allows handling the HTTP POST request and defining a /vision endpoint for it.
Let’s open the app.controller.ts file and make sure to have the following imports:
import { Controller, Post, Body, UseInterceptors, UploadedFile } from '@nestjs/common';
import { FileInterceptor } from '@nestjs/platform-express';
import { Express } from 'express';
import Multer from 'multer';

import { ChatContent } from 'data-model';
import { ChatService } from './chat.service';
import { TextService } from './text.service';
import { VisionService } from './vision.service';
Then, update the contructor method and make sure to inject the newly added VisionService:
// app.controller.ts
@Controller()
export class AppController {

  constructor(private readonly chatService: ChatService,
              private readonly textService: TextService,
              private readonly visionService: VisionService) {}
}
Finally, let’s implement a method to define the required endpoint and manage the HTTP POST request.
@Controller()
export class AppController {
  //...

  @Post('vision')
  @UseInterceptors(FileInterceptor('file'))
  uploadFile(@UploadedFile() file: Express.Multer.File, @Body() body: {message: string}) {
    return this.visionService.vision(body.message, file);
  }
}
The uploadFile method is decorated with the @Post() decorator, which means it handles the HTTP POST requests to the /vision endpoint.
The @UseInterceptors() decorator is used to handle file uploads in the request. The file argument is the name of the field in the request where the file is expected.
The uploadFile method then calls the vision method defined in the VisionService, passing the message from the body and the uploaded file as arguments.
Update the Client application
Currently, the client application implements a chatbot and a text generator view. We’ll separate the Image processing in a new one.
Update the Gemini Service
Before creating a new component, let’s update the Gemini Service to add the ability to send an Image file to the backend.
Open the existing gemini.service.ts file and add the vision method as follows:
// gemini.service.ts

@Injectable({
  providedIn: 'root',
})
export class GeminiService {

  //...

  vision(message: string, file: File): Observable<ClientChatContent> {
    const formData = new FormData();
    formData.append('file', file);
    formData.append('message', message);
    return this.httpClient.post<ClientChatContent>('http://localhost:3000/api/vision', formData);
  }
}
Let’s describe what’s happening in this code snippet:
- The
visionmethod takes themessagestring and the imagefile. It is used to send a POST request to the server.- Before connecting to the server, a new
FormDataobject is created. It’s a built-in web API that provides a way to send files and data over HTTP. - The
FormDataobject adds the message and the file through theappendmethod, which takes key/value pairs representing form fields and their values.
- Before connecting to the server, a new
Create a new Vision Component
It’s time to create a new component to handle the UI for image processing.
let’s create a vision component using the next command:
nx generate @nx/angular:component --name=vision --directory=vision --nameAndDirectoryFormat=as-provided --skipTests=true --style=scss
This will create the required files under a new vision folder.
Let’s open the vision.component.ts file and add the following code:
// vision.component.ts

import { Component } from '@angular/core';
import { CommonModule } from '@angular/common';
import { FormsModule } from '@angular/forms';

import { MatIconModule } from '@angular/material/icon';
import { MatInputModule } from '@angular/material/input';
import { MatButtonModule } from '@angular/material/button';
import { MatFormFieldModule } from '@angular/material/form-field';

import { GeminiService } from '../gemini.service';
import { LineBreakPipe } from '../line-break.pipe';
import { EMPTY, catchError, finalize } from 'rxjs';
import { ClientChatContent } from '../client-chat-content';

type ImageFile = { preview: string; file: File };

@Component({
  selector: 'corp-vision',
  standalone: true,
  imports: [
    CommonModule,
    MatIconModule,
    MatInputModule,
    MatButtonModule,
    MatFormFieldModule,
    FormsModule,
    LineBreakPipe,
  ],
  templateUrl: './vision.component.html',
  styleUrl: './vision.component.scss',
})
export class VisionComponent {
  message = '';
  contents: ClientChatContent[] = [];
  imageFile: ImageFile | undefined;

  constructor(private geminiService: GeminiService) {}

  selectImage(event: Event) {
    const inputElement = event.target as HTMLInputElement;
    const file = inputElement.files?.item(0);
    if (file) {
      const reader = new FileReader();
      reader.onload = (e: ProgressEvent<FileReader>) => {
        const preview = e.target?.result as string;
        this.imageFile = {file, preview};
      };

      reader.readAsDataURL(file);
    }
  }
}
Initially, we’ll need to create an abstraction for the image file, this can be done after adding the new ImageFile type.
Next, the selectImage method is implemented to handle the event when a user selects an image file from an input element of the type file. This will be shown in the template code later.
By default, the selected files will be returned as a FileList object. However, the app will support single selection only and we’ll get access to it through item(0) call, which is the first file in the list.
The onload property of the FileReader(read the file content) object is set to a function that will be called when the file has been successfully read. When that happens, the ProgressEvent target is retrieved and cast to a string. The string content can be used now to render the preview in the template.
Next, define a sendMessage method inside the component class as follows:
// vision.component.ts

@Component({
  // ...
})
export class VisionComponent {

  sendMessage(message: string): void {
    if(!this.imageFile) {
      return;
    }

    const chatContent: ClientChatContent = {
      agent: 'user',
      message,
      imagePreview: this.imageFile?.preview
    };
    const file = this.imageFile.file;

    this.contents.push(chatContent);
    this.contents.push({
      agent: 'chatbot',
      message: '...',
      loading: true,
    });

    this.message = '';
    this.imageFile = undefined;

    this.geminiService
      .vision(chatContent.message, file)
      .pipe(
        catchError(() => {
          return EMPTY;
        }),
        finalize(() => {
          const loadingMessageIndex = this.contents.findIndex(
            (content) => content.loading
          );
          if (loadingMessageIndex !== -1) {
            this.contents.splice(loadingMessageIndex, 1);
          }
        })
      )
      .subscribe((content) => {
        this.contents.push(content);
      });
  }
}
This method has a similar behavior as in the Text and Chat components. Let’s explain the main difference:
- The method checks if an image file has been selected. If no file has been selected, the method returns immediately.
- A new
ClientChatContentobject is created, including theimagePreviewstring, which allows rendering the image in the chat view. - Once the chat contents are set(
this.contents.push()calls), thevisionmethod of theGeminiServiceis called to send a POST request to the server. - When the server’s response is received, it is pushed to the
contentsarray.
Working on the Vision Template
The TypeScript code is ready for the brand-new component, we can now define the template for it. Let’s open the vision.component.html file and put the first part of the markup:
<div class="chat-container">
  <div class="message-container" *ngIf="contents.length === 0">
    <p class="message">
      Welcome to your Gemini Vision App <br />
      Write a text and attach an image to start.
    </p>
  </div>
  <div
    *ngFor="let content of contents"
    class="chat-message"
    [ngClass]="content.agent"
  >
    <img [src]="'assets/avatar-' + content.agent + '.png'" class="avatar" />
    <div class="message-details">
        <img *ngIf="content.imagePreview" [src]="content.imagePreview" height="150px" alt="Image Preview" />
        <p
            class="message-content"
            [ngClass]="{ loading: content.loading }"
            [innerHTML]="content.message | lineBreak"
        ></p>
    </div>
  </div>
</div>
The chat-container section is the container for all chat messages. If there are no messages yet, a welcome message will be rendered.
Inside each chat message element, there is an img element that displays the avatar either for the user or the chatbot. Each message detail is ready to render the image that has been sent for image processing. It will be shown along with the message text.
Let’s create a new section that supports the file uploading behavior:
<div class="chat-footer-container">
  <mat-form-field class="chat-input">
    <div class="image-preview" *ngIf="imageFile?.preview">
      <img [src]="imageFile?.preview" width="100px" alt="Image Preview" />
      <button mat-icon-button matTooltip="Remove" color="warn" (click)="imageFile=undefined;inputImage.value='';">
        <mat-icon class="custom-icon-size">close</mat-icon>
      </button>
    </div>
    <input
      placeholder="Send a message"
      matInput
      #inputMessage
      [(ngModel)]="message"
      (keyup.enter)="sendMessage(message)"
    />

    <button mat-icon-button matSuffix class="image-upload-button">
        <input type="file" accept="image/png, image/jpeg, image/webp" (change)="selectImage($event)" #inputImage/>
        <mat-icon>add_photo_alternate</mat-icon>
    </button>
  </mat-form-field>
  <button mat-icon-button color="primary" (click)="sendMessage(message);inputImage.value=''">
    <mat-icon>send</mat-icon>
  </button>
</div>
This section of the template defines the container for the chat input and send button. Inside the mat-form-field element, there’s an image-preview section that is displayed only if the imageFile object has a preview property.
Also, there is a button that contains an input element of type file. This button is used to upload the image file. Once the image is selected, the method selectImage of the component will be called.
As you may see, the input element adds the ability to select only PNG, JPEG, and WEBP files.
Source Code of the Project
Find the complete project in this GitHub repository: gemini-angular-nestjs. Do not forget to give it a star ⭐️ and play around with the code.
Conclusion
In this step-by-step tutorial, we demonstrated how to add the image processing ability to an existing web application using the Gemini API. The Nx workspace is ready to add shared code, or even add more applications as the project grows.
You can follow me on Twitter and GitHub to see more about my work.
Thank you for reading!
— Luis Aviles